👤 This article is for providers. Only provider accounts can upload presentation files to a course.
You can attach presentation slides, handouts, and other supporting materials directly to each course in your account. Once uploaded, these files are securely stored and visible only to you and the instructors you've granted access to the course. This article walks you through how to upload files, how to keep them organized, and what to do if your file is too large.
Before you begin
- You must be logged in with a provider account that has permission to manage courses.
- The course must already exist. See Add a Course if you need to create one.
- File size limit: Each file cannot exceed 30 MB.
- Have your file ready on your computer. If your file exceeds 30 MB, see the compression section below before uploading.
💡 Tip: Use a clear, consistent naming convention so your instructors can quickly find the right file. For example:
CompanyName_CEU_PowerPoint_mmddyy.pptx.
How to upload presentation files
- Sign in to www.ceuevents.com using your provider account credentials.
- Click on the Courses menu.
- Find the course you want to upload a file for and click the Attach files button.
- Browse your computer for the file you want to upload and click Open.
- Confirm the file appears in the attached files list before continuing.
- Repeat the process for each additional file you would like to attach.
Who can see the uploaded files?
Once uploaded:
- Your files are securely stored and immediately available to the instructors who have access to that course.
- Files are visible only to you and the instructors you've linked to the course — they are not publicly accessible.
- Instructors will see the attached files when they access the course in their account.
Reducing file size with PowerPoint image compression
If your file exceeds the 30 MB limit, compressing the images inside your PowerPoint presentation is the fastest way to bring the file size down without affecting the content.
- Open your PowerPoint presentation.
- Click on any picture within the presentation.
- Go to the Picture Tools Format tab.
- Click Compress Pictures.
- Select your Compression options (e.g., apply to selected picture only or all pictures, delete cropped areas).
- Select your Resolution — web or screen resolution typically reduces size the most.
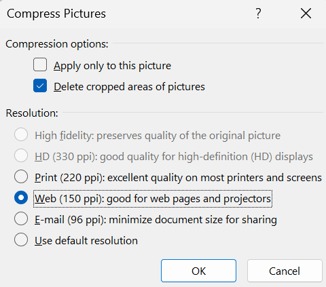
- Click OK.
- Save the file.
- Confirm the new file size is under 30 MB before uploading.
💡 Tip: If your file is still too large after compression, contact CEU Events support. For Fully Managed providers, we have the option to link directly to your file libraries.
Troubleshooting
- Your upload fails with a file size error. The file likely exceeds the 30 MB limit. Use the compression steps above to reduce its size. If compression doesn't bring it under 30 MB, contact CEU Events support for assistance.
- An instructor says they can't see the file. Confirm the instructor has access to the specific course the file is attached to. See Manage Instructor Course Access.